Replacing a Bad Inverter on a Toshiba Laptop...
The year has just begun and my laptop decided to bork. It already borked some time ago. The problem was the backlight: it started blinking and the laptop would go to sleep. I search the web and found this blog. I tried to figure out if this was the problem with my laptop, but I was almost sure it wasn't, because even if I connected an external monitor Linux kept receiving spurious lid close events. It turned out to be the board that had the lid closing button. The trick was to find the parts, but I was lucky enough. I called my old boss, who also bought the same laptop as I did and asked her what happened. Well, it turns out that the laptop was going for recycling. Not a moment too late! I asked for it, she gave it to me for free (thank you!!!) and I repaired my laptop using the board of her laptop - which seems to have a broken video card...
Today the backlight finally hit the fan. I had been noticing some flickering of the backlight for some days but I completely ignored it and resumed working. It seemed to stabilize after some warming up. But today it went down and didn't came up, even after turning off the laptop and turning it on. I remembered the article and got to it. Since this might be useful for someone else I'm putting some instructions and a couple of pictures of the process. The pictures aren't fully illustrative, but it should be sufficient to get you there.
First thing: opening the laptop. This might sound easy but it should be done carefully so as not to scratch the laptop. This is a Toshiba laptop so you should first remove the button cover. This can be done by starting by the right side of the cover: you can find a small gap that is perfect to put a screwdriver in.
But you also need to open the screen. This is trickier. The screen has four screws: one in each corner. The top ones are hidden bellow the rubbers that protect the screen one it is closed. The lower ones are hidden below to little plastic covers that are glued on top of them. Remove the lower covers with care because you want to glue them again in order to hide the screws. In the top just unglue the rubbers from the inside out just the sufficient to unscrew. I didn't remove the rubbers.
Finally, and to complete the opening up of the screen you have to very gently start pulling the plastic cover. I'm not going to lie: this is something that is not for the faint of heart. I started in the lower part of the screen with my fingers pulling the plastic await from the screen, right above the TOSHIBA logo. Then I worked steadily with my hands as a small screwdriver all the way around the screen. The top of the screen is trickier, but once you free the lower and sides of the cover you can simple use the screwdriver to force free the top. DON'T FORCE the release of the spring that hold the cover shut when the laptop is closed: it is attached to the back plastic of the screen only. If you try to free it you might break something...
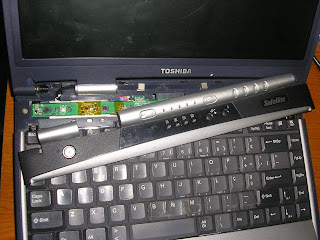
You should end up with something like this:

And these are the covers that were removed, set them aside:

With these covers removed the back plastic cover of the screen should fall off without a lot of effort.

Now you need to find the Inverter. The inverter is on the lower part of the screen. You can't miss it: it is the only board with integrated circuits in the screen. To remove it you will have to unglue the metallic protection on the front and remove two screws. After this you can the backlight power cord on the right (two black and white wires that go into the screen that control the backlight) and the control line on the left (this is trickier because it has isolating tape around it). Do not tear any of the tape or protections, you will need them later. I only unglued what was essential. Then you have the inverter free from the laptop.

Now, all you have to do is find a replacement for this part. Maybe eBay can help you, or even Toshiba. Since I have a scrap laptop I repeated the process and simple replaced the Inverter. Then is just a matter to mounting everything back up. It should be simple, don't force anything in: the plastics should go in nice and easy.
After all this process my laptop was running with a working screen.

Of course I'm very lucky for having an old laptop to steal parts from, but if you can find the missing part and it is not too expensive it beats having to by a new laptop. Hope this helps you and, once again, I would like to thank my old boss for providing me with a scrap laptop to remove parts from.
Today the backlight finally hit the fan. I had been noticing some flickering of the backlight for some days but I completely ignored it and resumed working. It seemed to stabilize after some warming up. But today it went down and didn't came up, even after turning off the laptop and turning it on. I remembered the article and got to it. Since this might be useful for someone else I'm putting some instructions and a couple of pictures of the process. The pictures aren't fully illustrative, but it should be sufficient to get you there.
First thing: opening the laptop. This might sound easy but it should be done carefully so as not to scratch the laptop. This is a Toshiba laptop so you should first remove the button cover. This can be done by starting by the right side of the cover: you can find a small gap that is perfect to put a screwdriver in.

But you also need to open the screen. This is trickier. The screen has four screws: one in each corner. The top ones are hidden bellow the rubbers that protect the screen one it is closed. The lower ones are hidden below to little plastic covers that are glued on top of them. Remove the lower covers with care because you want to glue them again in order to hide the screws. In the top just unglue the rubbers from the inside out just the sufficient to unscrew. I didn't remove the rubbers.
Finally, and to complete the opening up of the screen you have to very gently start pulling the plastic cover. I'm not going to lie: this is something that is not for the faint of heart. I started in the lower part of the screen with my fingers pulling the plastic await from the screen, right above the TOSHIBA logo. Then I worked steadily with my hands as a small screwdriver all the way around the screen. The top of the screen is trickier, but once you free the lower and sides of the cover you can simple use the screwdriver to force free the top. DON'T FORCE the release of the spring that hold the cover shut when the laptop is closed: it is attached to the back plastic of the screen only. If you try to free it you might break something...
You should end up with something like this:

And these are the covers that were removed, set them aside:

With these covers removed the back plastic cover of the screen should fall off without a lot of effort.

Now you need to find the Inverter. The inverter is on the lower part of the screen. You can't miss it: it is the only board with integrated circuits in the screen. To remove it you will have to unglue the metallic protection on the front and remove two screws. After this you can the backlight power cord on the right (two black and white wires that go into the screen that control the backlight) and the control line on the left (this is trickier because it has isolating tape around it). Do not tear any of the tape or protections, you will need them later. I only unglued what was essential. Then you have the inverter free from the laptop.

Now, all you have to do is find a replacement for this part. Maybe eBay can help you, or even Toshiba. Since I have a scrap laptop I repeated the process and simple replaced the Inverter. Then is just a matter to mounting everything back up. It should be simple, don't force anything in: the plastics should go in nice and easy.
After all this process my laptop was running with a working screen.

Of course I'm very lucky for having an old laptop to steal parts from, but if you can find the missing part and it is not too expensive it beats having to by a new laptop. Hope this helps you and, once again, I would like to thank my old boss for providing me with a scrap laptop to remove parts from.
Comments
Post a Comment